Bash Script – SMART Status & Temps of Drives

Bash Script – SMART Status & Temps of Drives

This is a bash script I wrote for quickly grabbing the S.M.A.R.T status on all drives attached to a system along with their current temperatures. It uses ‘smartctl’ from smartmontools (www.smartmontools.org) to grab the SMART information from drives and presents snippets of that information in a nicely formatted table, including:

  • path of the drive
  • temperature reading
  • model number
  • serial number
  • overall SMART status


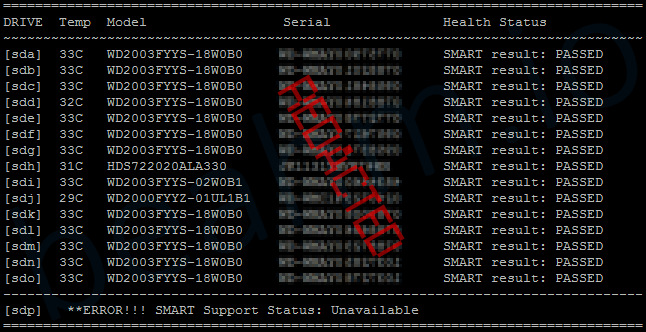
Here’s what it looks like, on one of my servers


Feel free to grab this script’s source code below; using or altering as you’d like


#! /bin/bash
##
# prints formatted SMART results for all drives
# tested and working on: Ubuntu 18.04.1 LTS (Bionic Beaver)
##
echo "================================================================================"
echo "DRIVE::Temp::Model::Serial::Health Status" | awk -F:: '{printf "%-7s%-6s%-22s%-20s%s\n", $1, $2, $3, $4, $5}'
echo "~~~~~~~~~~~~~~~~~~~~~~~~~~~~~~~~~~~~~~~~~~~~~~~~~~~~~~~~~~~~~~~~~~~~~~~~~~~~~~~~"
for i in $(lsblk | grep -E "disk" | awk '{print $1}')
do
DevSupport=`smartctl -a /dev/$i | awk '/SMART support is:/{print $0}' | awk '{print $4}' | tail -1`
if [ "$DevSupport" == "Enabled" ]
then
DevTemp=`smartctl -a /dev/$i | awk '/Temperature/{print $0}' | awk '{print $10 "C"}'`
DevSerNum=`smartctl -a /dev/$i | awk '/Serial Number:/{print $0}' | awk '{print $3}'`
DevName=`smartctl -a /dev/$i | awk '/Device Model:/{print $0}' | awk '{print $4}'`
DevStatus=`smartctl -a /dev/$i | awk '/SMART overall-health/{print $0}' | awk '{print $1" "$5" "$6}'`
echo [$i]::$DevTemp::$DevName::$DevSerNum::$DevStatus | awk -F:: '{printf "%-7s%-6s%-22s%-20s%s\n", $1, $2, $3, $4, $5}'
fi
done
##
# now find drives that don't have SMART enabled and warn user about these drives
##
echo "--------------------------------------------------------------------------------"
for i in $(lsblk | grep -E "disk" | awk '{print $1}')
do
DevSupport=`smartctl -a /dev/$i | awk '/SMART support is:/{print $0}' | awk '{print $4}' | tail -1`
if [ "$DevSupport" != "Enabled" ]
then
echo [$i]::$DevSupport | awk -F:: '{printf "%-6s **ERROR!!! SMART Support Status: %s\n", $1, $2}'
fi
done
echo "================================================================================"

I’m still new to the Linux/Unix universe and scripting on it. Please let me know if you run into any problems or if you have suggestions on how I can improve my script or feel free to give my any feedback you may have!


Script was built using the following:

—   Ubuntu: 18.04.1 LTS – Bionic Beaver
—   Smartmontools: 6.6 – SVN rev 4324
—   GNU bash: 4.4.19(1)-release (x86_64-pc-linux-gnu)

**Drives must have SMART support, along with enabling SMART in the system’s BIOS


For now this script is pretty basic barely skims the surface on managing drives properly, therefore you shouldn’t rely on this as the only form of health checks for your drives.

I plan to work more on drive monitoring scripts and hopefully will be able to offer more in the future. I’d love to see any improvements and variants you create on this scripts, or scripts you use for drive monitoring. Feel free to share them in the comments!


I’ve enjoyed scripting on Linux and look forward to learning more, thanks for reading

Linux Informatics – Cleaning Data With ‘grep’

Linux Informatics – Cleaning Data With ‘grep’

Say you have a larger text file with a bunch of lines that you don’t need or don’t want in there, how do you remove them? When working with multiple large files, such as log files, this can be a a major waste of time when done it by hand.

If you are lucky enough that the lines you need to filter out from your data have a common pattern (which just happens to be the case with most properly formatted log files) then properly learning the ‘grep’ command can save you massive amounts of time. It’s also really not that hard as you only need to learn how to utilize various options and/or special characters in conjunction with ‘grep’


Here’s a small snippet from a larger ‘.bash_history’ file I was working with in CentOS 7.

#1537917992
whoami
#1538087893
ls -l
#1538087953
cat zone*
#1538087974
cat zone*| more

The .bash_history file is a log file which each user has in their home directory, this file contains all commands the user ran in the bash shell

This specific bash history file has lines that show the epoch timestamp before each command that was actually entered by the user.
This could be very useful in certain situations where you need the time that a command was entered. Yet these timestamps can be problematic if you have a script trying to access this file’s information and your script isn’t configured to read information with this very specific format.

How can we remove these unwanted lines?

Well this small snippet of only 8 lines and it would be easy enough to remove any lines by hand. The full log file I was working with had 254 lines to work with which would be considered small in terms of log files, but still quite a huge pain if you had to do it by hand!

One utility that would fit this job perfectly would be ‘grep’ which typically searches through a file line by line and spitting back lines that contain the matching pattern that you are searching for. You can also use the ‘-v’ option with grep to “invert” the information you receive back from it; so instead of grep showing you lines that DO match it will show you lines that DON’T match.


Removing lines with the 'grep' utility
The ‘-v’ option with grep makes a great tool for removing lines that have a common pattern!
[simterm] $ grep -v pattern filename.txt
[/simterm] (this would output all lines from a file named ‘filename.txt’ which don’t have the word ‘pattern’)

This example would still output any lines that any variant of the word ‘pattern’ which where the word isn’t in all lower-case letters, such as ‘Pattern’ or ‘PATTERN’ or ‘pattErn’. This is because grep does case-sensitive searches by default.


Case-insensitive searches with 'grep'
Case-insensitive searches are done with the ‘-i’ option.
[simterm] $ grep -v -i pattern filename.txt
[/simterm]


Easier combination of multiple options
In most environments it’s completely acceptable and easier to combine short options, like this

[simterm] grep -vi pattern filename.txt
[/simterm] (note: typically shouldn’t/can’t combine ‘long options’ which are those that are started with a doubledash ‘––’ )

The specific log file that I was working with didn’t require any case sensitive or insensitive searches though, as I’m simply trying remove lines that start with pound-sign.


Easier combination of multiple options
This is how you would you remove all lines starting with ‘#’ in a file named ‘.bash_history’

[simterm] grep -v ^\# .bash_history
[/simterm]


… This can be quite confusing to understand if you’re just starting out.  Let’s break it down! 


Command Breakdown : grep -v ^# filename

-v is the option to invert the search results, so grep will only output lines that don’t have the pattern you are searching for

^\# this what we are actually telling grep to search for on each line… But you might be wondering right now “I thought we would only be searching for #… what does ^# even mean?!”

^ is a special character which grep will read as “any line starting with” so if we didn’t use that then it would all lines that had a pound-sign anywhere on the line and not just at the beginning

\ is called an escape character… character following the backslash won’t be read as a special command, but instead as just plaintext

# is what we are actually searching for on the lines!

filename is of course the name or path to the file we want grep to work with and search through

read more on ‘escape characters’ — http://tldp.org/LDP/Bash-Beginners-Guide/html/sect_03_03.html


Now that you know some useful grep basics
Let’s work on using the outputted data that ‘grep’ gives us in various ways, such as actually viewing this data in a better format or saving it for later by using pipes or redirects.


Piping the output into 'more'
One option is piping the output into another command. Here’s an example piping the output into ‘more’ for viewing large data outputs in a terminal environment by hand.
[simterm] grep -v ^\# .bash_history | more
[/simterm] a simple pipe, by using using ‘ | ‘ between commands


Redirecting the output into a new file
Another option is saving the cleaned up data into a new file, by redirecting our grep output into another file.
(Don’t redirect into the same file!!… This nukes the file; leaving it blank!)

[simterm] grep -v ^\# .bash_history > .bash_history_cleaned
[/simterm] a simple redirect, using ‘ > ‘ and then the new file’s name


Redirecting the output into the same file (overwriting the original!)

In less frequent cases, you may just want to quickly clean up a file and permanently trash unwanted lines from it.

[simterm] grep -v ^\# .bash_history > temp.file && cat temp.file > .bash_history && rm temp.file
[/simterm] This example redirects the cleaned data into temporary file, then outputs that temporary file back into the original file. Overwriting all of the old file’s data with the cleaned up data!


What exactly is the ‘&&’ from that last command?
&&  is an ‘operator’ and is used as a way to string multiple commands. Specifically with the ‘&&’ operator, the next command is dependent on the command before it. This means the next command won’t execute unless the command before it ran successfully.

(more on ‘operands’ https://www.gnu.org/software/bash/manual/bashref.html#Lists)


— Hope this has helped you on your learning journey, thanks for reading! —

9207-8i SAS Adapters

9207-8i SAS Adapters

I finally was able to get my hands on some quality Host Bus Adapters, which means I’ll finally be able to set up a proper ZFS network storage pool for my home network!

The SAS 9207-8i Host Bus Adapters are great for the price and can be found used for around $50 or less if you do some patient shopping around.

At the heart of this card is the LSISAS2308 6Gb/s SAS/SATA hybrid controller and offers:

  • 8 SAS/SATA lanes @ 6Gb/s — totaling to 48Gb/s
  • PCIe3.0 8x (8Gb/s per 1x lane) — a 64Gb/s connection to the mainboard
  • 2 mini-SAS connectors (SFF8087) — full 48Gb/s SAS/SATA connection speed to the storage devices

I plan to install one of these HBAs in my HP Proliant DL380P Gen8 server, which has a 12 drive LFF (3.5″) backplane with 2 mini-SAS connectors for connection to the HBA.
Then I plan to create a ZFS storage pool, on FreeNAS Operating System inside of VMware’s vSphere Hypervisor (ESXi) 6.5 Update 2,  with 10x 2TB HDDs and 2x 240GB SSDs.

Of course all of this may take some time, as I’m currently in my Summer quarter at college and have a lot on my plate already and I want to do some more in-depth testing before committing to the current build-plan.

Honeypot Server

Honeypot Server

This is just a test post, for now. I do plan on eventually creating a honeypot server, so stay tuned!

Something about internet honeypots using SSH, TSL, AES, and all that other cool encryption lingo.

Handshake with a HELLO SYN ACK and what ever else sounds cool!

Blah

Blah

Hackers!

Blah

More security buzzwords.

Thanks,
Bye